> ## Documentation Index
> Fetch the complete documentation index at: https://docs.vortexiq.ai/llms.txt
> Use this file to discover all available pages before exploring further.
# StagingPro Notifications, Email, Slack, and Microsoft Teams
StagingPro can push deployment and migration alerts to three channels: email, Slack, and Microsoft Teams. Set at least one up before running migrations so you have visibility into what just happened. Set up multiple channels for redundancy on critical environments. This page covers the setup for each.
## Where to configure
Open **Settings** and click the **Status Notifications** sub-tab.
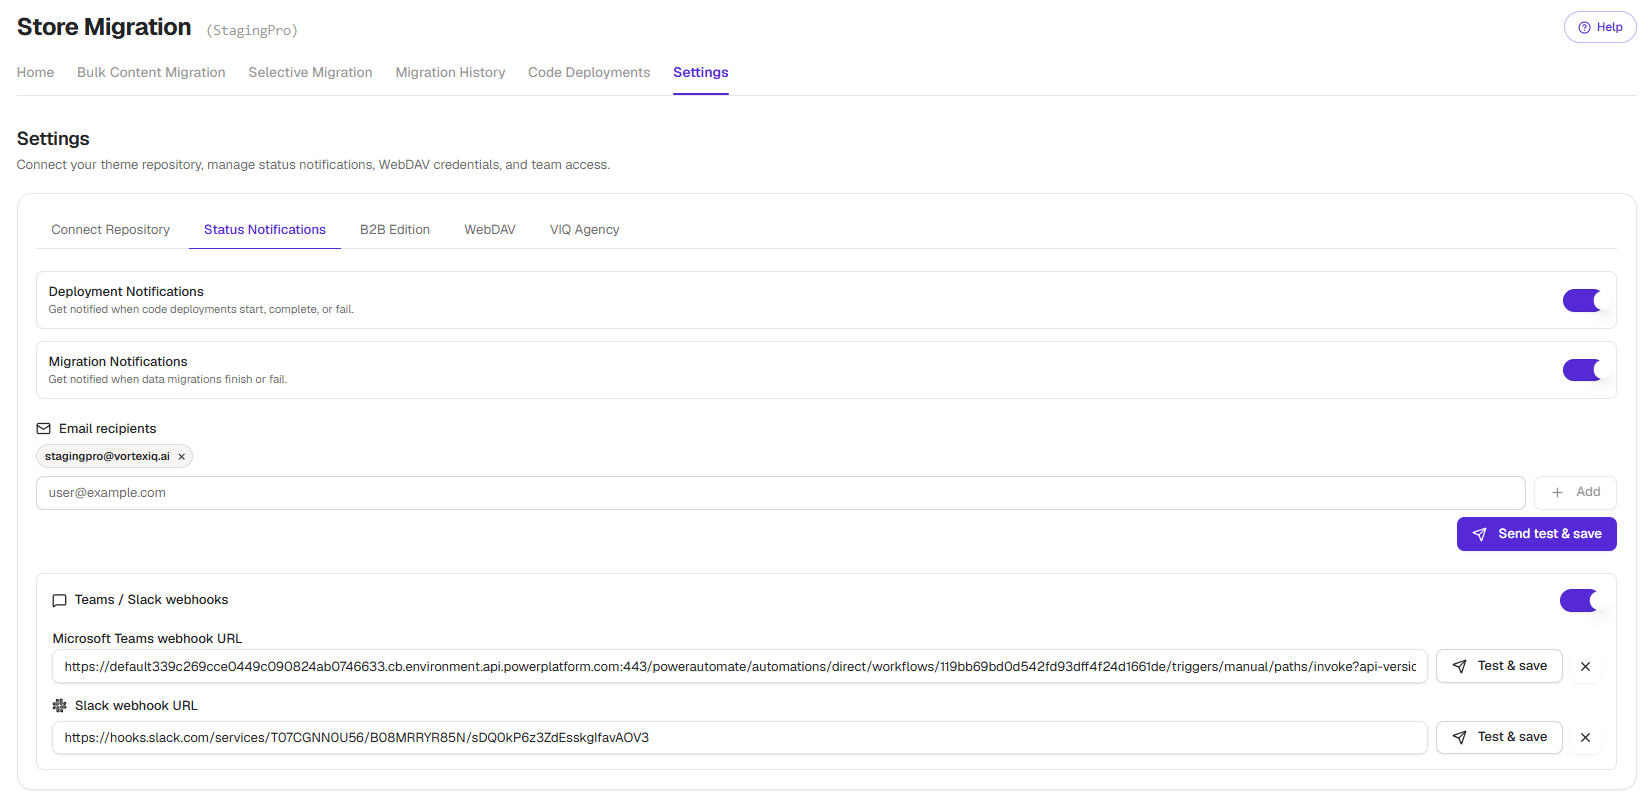 Two notification categories are togglable independently:
* **Deployment Notifications**, alerts on theme deployments (start, complete, fail, rollback).
* **Data Migration Notifications**, alerts on bulk and selective migrations.
Tick whichever combination matches the events your team needs to see.
## Email notifications
Email is the simplest path. No webhook configuration needed.
1. Open **Settings, Status Notifications**.
2. Enter an email address in the **Email Notification** field.
3. Click the **+Add** button to add it. The address appears as a chip; you can add multiple addresses by repeating.
4. Tick **Deployment Notifications**, **Data Migration Notifications**, or both.
5. Click **Send Test Email & Save** to verify routing and persist the configuration.
To remove an email address, click the X on its chip. To re-test, use the same Send Test Email & Save button.
## Slack notifications
Slack uses an Incoming Webhook for delivery. Three steps: create the channel in Slack, create the Slack app and webhook, paste the webhook into StagingPro.
### Step 1, set up the Slack channel
1. In Slack, click the "..." next to **Channels** in the sidebar.
2. Choose **Create a channel**.
3. Give the channel a unique name and click **Create**.
4. Add channel members. If everyone in your workspace should see StagingPro alerts, leave the default; otherwise add specific users.
5. The channel appears in your sidebar.
### Step 2, create the Slack app and incoming webhook
1. Open [api.slack.com](http://api.slack.com) in a new tab.
2. Click **Create an app**.
3. Select **From scratch**.
4. Give the app a name and pick your workspace from the dropdown.
If the workspace dropdown is empty, you are not signed in to that workspace; sign in to Slack and reload api.slack.com.
5. Click **Create App**.
6. Under **Add features and functionality**, choose **Incoming Webhooks** and click **Save Changes**.
7. Confirm the **Activate Incoming Webhooks** toggle is **On**, then click **Add New Webhook to Workspace**.
8. Slack asks permission to access your workspace. Pick the channel you created in Step 1 and click **Allow**.
9. The webhook URL is generated. Click **Copy** and keep it on the clipboard.
### Step 3, connect the webhook to StagingPro
1. Open **Settings, Status Notifications** in StagingPro.
2. Click **Add Channel** and select the **Slack** icon.
3. Paste the Slack webhook URL into the Slack channel text box.
4. Click **Send Test Message & Save**, type a test message, and click **Send**.
5. Switch to your Slack channel and confirm the test message arrived.
## Microsoft Teams notifications
Teams uses a Workflow webhook (the modern approach, replacing the older Incoming Webhook connector). Three steps: create the Team and channel, create the Workflow, paste the webhook URL into StagingPro.
### Step 1, create the Team
If you do not already have a Team in Microsoft Teams:
1. Open Microsoft Teams. Click **Teams** in the sidebar.
2. Click **Create Team**.
3. Give the team a unique name and click **Next**.
4. Add team members by name or email.
### Step 2, create the channel
1. Hover over your Team name and click the "..." that appears.
2. Click **Add Channel** and give the channel a unique name.
### Step 3, create the Workflow webhook
1. Hover over the channel name until "..." appears, click it.
2. Click **Workflows**.
3. Choose **Post to a channel when a webhook request is received**.
4. Name the workflow and click **Next**.
5. Click **Add workflow**.
6. Copy the unique workflow URL shown in the dialog. Click **Done**.
### Step 4, connect to StagingPro
1. Open **Settings, Status Notifications** in StagingPro.
2. Click **Add Channels** and select the **Microsoft Teams** icon.
3. Paste the Workflow URL into the Teams Channel field.
4. Click **Test & Save**.
5. Type a test message and click Send.
6. Switch back to the Teams channel and confirm the test message appeared.
***
## Please remember
* After any change to the email checkboxes or addresses, click **Send Test Email & Save** to persist the change. The button doubles as save.
* Same for Teams Settings: changes need **Test & Save**.
* Same for Slack Settings: changes need **Test & Save**.
* Notifications are not user-specific. If you have set up an email or webhook channel, every event of the enabled types fires to that destination. Filter at the Slack or Teams side if needed.
Two notification categories are togglable independently:
* **Deployment Notifications**, alerts on theme deployments (start, complete, fail, rollback).
* **Data Migration Notifications**, alerts on bulk and selective migrations.
Tick whichever combination matches the events your team needs to see.
## Email notifications
Email is the simplest path. No webhook configuration needed.
1. Open **Settings, Status Notifications**.
2. Enter an email address in the **Email Notification** field.
3. Click the **+Add** button to add it. The address appears as a chip; you can add multiple addresses by repeating.
4. Tick **Deployment Notifications**, **Data Migration Notifications**, or both.
5. Click **Send Test Email & Save** to verify routing and persist the configuration.
To remove an email address, click the X on its chip. To re-test, use the same Send Test Email & Save button.
## Slack notifications
Slack uses an Incoming Webhook for delivery. Three steps: create the channel in Slack, create the Slack app and webhook, paste the webhook into StagingPro.
### Step 1, set up the Slack channel
1. In Slack, click the "..." next to **Channels** in the sidebar.
2. Choose **Create a channel**.
3. Give the channel a unique name and click **Create**.
4. Add channel members. If everyone in your workspace should see StagingPro alerts, leave the default; otherwise add specific users.
5. The channel appears in your sidebar.
### Step 2, create the Slack app and incoming webhook
1. Open [api.slack.com](http://api.slack.com) in a new tab.
2. Click **Create an app**.
3. Select **From scratch**.
4. Give the app a name and pick your workspace from the dropdown.
If the workspace dropdown is empty, you are not signed in to that workspace; sign in to Slack and reload api.slack.com.
5. Click **Create App**.
6. Under **Add features and functionality**, choose **Incoming Webhooks** and click **Save Changes**.
7. Confirm the **Activate Incoming Webhooks** toggle is **On**, then click **Add New Webhook to Workspace**.
8. Slack asks permission to access your workspace. Pick the channel you created in Step 1 and click **Allow**.
9. The webhook URL is generated. Click **Copy** and keep it on the clipboard.
### Step 3, connect the webhook to StagingPro
1. Open **Settings, Status Notifications** in StagingPro.
2. Click **Add Channel** and select the **Slack** icon.
3. Paste the Slack webhook URL into the Slack channel text box.
4. Click **Send Test Message & Save**, type a test message, and click **Send**.
5. Switch to your Slack channel and confirm the test message arrived.
## Microsoft Teams notifications
Teams uses a Workflow webhook (the modern approach, replacing the older Incoming Webhook connector). Three steps: create the Team and channel, create the Workflow, paste the webhook URL into StagingPro.
### Step 1, create the Team
If you do not already have a Team in Microsoft Teams:
1. Open Microsoft Teams. Click **Teams** in the sidebar.
2. Click **Create Team**.
3. Give the team a unique name and click **Next**.
4. Add team members by name or email.
### Step 2, create the channel
1. Hover over your Team name and click the "..." that appears.
2. Click **Add Channel** and give the channel a unique name.
### Step 3, create the Workflow webhook
1. Hover over the channel name until "..." appears, click it.
2. Click **Workflows**.
3. Choose **Post to a channel when a webhook request is received**.
4. Name the workflow and click **Next**.
5. Click **Add workflow**.
6. Copy the unique workflow URL shown in the dialog. Click **Done**.
### Step 4, connect to StagingPro
1. Open **Settings, Status Notifications** in StagingPro.
2. Click **Add Channels** and select the **Microsoft Teams** icon.
3. Paste the Workflow URL into the Teams Channel field.
4. Click **Test & Save**.
5. Type a test message and click Send.
6. Switch back to the Teams channel and confirm the test message appeared.
***
## Please remember
* After any change to the email checkboxes or addresses, click **Send Test Email & Save** to persist the change. The button doubles as save.
* Same for Teams Settings: changes need **Test & Save**.
* Same for Slack Settings: changes need **Test & Save**.
* Notifications are not user-specific. If you have set up an email or webhook channel, every event of the enabled types fires to that destination. Filter at the Slack or Teams side if needed.